Formatting a Microsoft Word document is not just solely about aesthetics; it is a direct reflection of your professionalism, attention to detail, and understanding of the essential business tool. For high achievers and professionals, the way a document is constructed can influence perceptions of you, drive clarity of your covered concepts, and set the standard for your communication within anyone and everyone.
Not Everything Can Be Covered Here
While this blog provides a crisp summary of essential document formatting skills and techniques for Microsoft Word, it’s important to recognize that this topic is vast and complex. In fact, grasping all the features and best practices for professional formatting typically requires a comprehensive four-part curriculum totaling 28 hours of classroom instruction.
The tips and strategies I am sharing here are designed to provide a strong foundation by pointing you in the best direction possible. These tips and guidelines represent only a fraction of what’s possible with Word’s powerful formatting set. If you’re aiming for true prowess, consider exploring advanced in-person or video training to unlock the full potential of your documents. I used to teach courses like these at New Horizons Computer Learning Center, San Diego for nearly four years.
- You can read my blog about software training courses at the following link: https://www.lifecycle365.com/software-training-courses-arent-structured-the-way-you-think
Why Formatting and Structure Matters
A well-formatted document does more than present information or text content. It demonstrates your ability to organize your thoughts, respect your reader’s time, and leverage technology to communicate successfully. In many industries and situations, your document structuring skills may be the first impression you make… whether it is a resume, proposal, contract, blog, manual, report, or internal memo. Sloppy formatting can undermine even the strongest content, while a polished document signals credibility and regard.
- You can read my blog about reviewing resumes and hiring responsibilities at the following link: https://www.lifecycle365.com/hiring-and-resume-review
Common Formatting Pitfalls
Here are some of the most frequent issues and traps that even experienced employees can fall into that diminish the impact of their documents and communications.
- Inconsistent use of fonts style
- Erratic text sizing
- Mismatched font colors
- Manual spacing and tabbing to align text
- Uneven margins or unpredictable line breaks
- Lack of clear titles or headings
- Illogical hierarchical structure of content
- Overuse of font formatting (bold, italics, or underlining) for emphasis
- Awkward transitions because of an absence of page breaks or columns
These mistakes often stem from a lack of familiarity with Word’s core features. Relying on manual formatting adjustments instead of styles, tables, paragraph tools, or proper alignment features results in documents that are difficult to read and even harder to update.
The Power of Styles
One of the most underutilized features in Microsoft Word is the Styles gallery. Using Styles for titles, headings, subheadings, bullet points, and body text ensures consistency throughout your document. It also enables quick navigation, automated table of contents generation, and seamless formatting updates.
Tip: Always assign at least “Heading 1”, “Heading 2”, and “Normal” body text Styles within your documents rather than manually formatting the font size, colors, and weight. This not only saves time, but ensures that your document formatting is consistent, while also safeguards that your communications remain accessible and professional.
Where do I find Styles?
Microsoft Word à “Home” Ribbon à “Styles”

Alignment and Spacing
Manual tabbing or spacing to align text is a clear sign of amateur formatting. Instead, use Word’s alignment tools like indent, tabs, bullets, tables, and paragraph settings. For example, to align dates or figures, insert a table with invisible borders or use the tab stops feature at the top within the ruler. For section breaks, use the built-in “Page Break” or “Section Break” commands rather than repeatedly pressing Enter.
Rule: No key on your keyboard should be pressed more than twice in a row. If you find yourself doing so, there is likely a more efficient and professional method available.
- Pressing Space Space Space Space Space Space Space, does not and should not replace a “Tab” or “Indent”
- Pressing Enter Enter Enter Enter Enter Enter Enter does not and should not replace a “Page Break”
- There is no word in English that has three of the same letters in the row as well, not even Mississippi.
Where do I find Paragraph Formatting
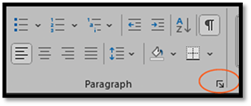
Start on the “Home” Ribbon and then select the “more” option on the bottom right next to the word “Paragraph” as circled below in orange. This will bring up the tools you need to be more precise at alignment, spacing, and text flow within the document.

Visual Hierarchy and Readability
A professional document should guide the reader’s eye naturally from section to section which is achieved by doing the following.
- Using clear, descriptive headings
- Maintaining consistent spacing before and after paragraphs
- Align text on both the left margin and when centered
- Employing bullet points or numbered lists for clarity
- Ensuring sufficient contrast between text and background
Avoid clutter and unnecessary decoration. Simplicity and clarity are hallmarks of high-level business communication.
Protect Your Document from Unacceptable Formatting Issues
One of the most common ways documents become cluttered or inconsistent is through careless “copying and pasting” of text that you are “borrowing” from another source. When you copy content from a PDF or a website, you will bring along hidden and unsightly formatting with the text. This is why font types, text sizes, paragraph alignment, colors, line spacing, and other artifacts included in your “copy and paste” disrupt your document’s style and structure.
Best Practice: Whenever you need to bring in text from another source, always use “Paste Special” and select “Paste Text Only” option. This strips away all the original formatting, ensuring that your document’s styles and formatting remain intact. You can then apply your own headings, bullet points, and other formatting as needed.
How to do it:
- “Copy” the text you want to insert
- In Word, go to the place in the document where you want to paste in the text
- “Left click” one time to place the cursor in the right place
- Select the “Home” tab
- Click the drop-down arrow under “Paste”
- Under “Paste Options”
- Select “Keep Text Only (T)”

This simple change in your habits will prevent broken or inconsistent formatting from infecting your document, keeping your work clean, professional, and easy to maintain.
Hyperlinks and References
For documents that reference external resources, always use clickable hyperlinks. This not only improves usability but also demonstrates your understanding of digital document best practices. Ensure that all links are descriptive and relevant, avoiding generic phrases like “click here.”
Insert a Hyperlink
- Select the “Text” that you want to make the Hyperlink
- Press the keyboard shortcut “Ctrl” + “k”
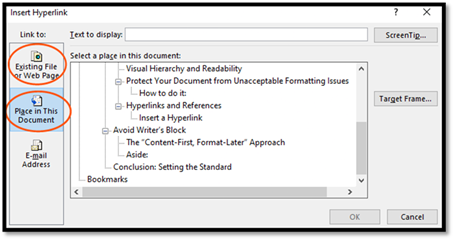
- The choose from the left menu where the link will take those that click on it
- “Existing File or Web Page”
- “Place in this Document”
Avoid Writer’s Block
One of the most effective ways to avoid writer’s block and ensure your document is both comprehensive and professional is to separate the writing and formatting processes. Start by focusing entirely on your ideas and information while not worrying about how it looks at first. Just type and type and type and type until you have captured every point you want to communicate before you decide to begin styling your text and document.
The “Content-First, Format-Later” Approach
- Create the New File: Do a “File” à “Save As” for the blank file to a location that will sync to the cloud with your OneDrive and name the file very explicitly.
- Write all the Text: From the blank file to the one that includes every bit of text that you believe needs to be included.
Once all your content is in place, follow this step-by-step process to transform your draft into a polished, professional document. - Spell Check: Run a spell check to catch any typos or misspelled words.
- Grammar Check: Use Word’s grammar tools to correct sentence structure and clarity.
- Add Bullets: Organize lists and key points with bullet points or numbered lists for better readability.
- Apply Styles: Assign Styles to headings, subheadings, and body text to ensure consistency and enable easy navigation.
- Insert Tables: Add tables for any data or structured information, using Word’s table tools for alignment and clarity.
- Add Citations and References: Use Word’s referencing tools to insert citations and build a bibliography or reference list as needed.
- Add Table of Contents: Insert an automatic Table of Contents, which will update as you adjust headings and sections.
- Refresh the Table of Contents: Update the Table of Contents to reflect any changes or additions.
- Review the Content: Ensure make any corrections required before calling the document a final version
- Final Save: Give yourself a chance to name the file correctly and to save the document as a PDF or in another format if required.
By following this workflow, you keep your focus on the quality of your content first, then elevate your work with professional styling. This method not only helps you avoid getting stuck on appearance too early, but also ensures your finished document meets the highest standards of clarity and presentation.
Aside:
Think of document creation like building a house. One would never paint a house before all the walls were built. One would never put the carpet in before the roof was on. There is a logical and standard process for construction and following it ensures every part fits together perfectly and does not get ruined before the house is even sold. The same principle applies to writing, styling, and formatting of documents in Microsoft Word: focus on building your content first, then apply the finishing touches. This approach makes everything smoother, more efficient, and ultimately results in a stronger final product.
Conclusion: Setting the Standard
Document formatting is not a trivial detail, it deserves attention. It is a core professional skill that illustrates if you are a high achiever and distinguishes you from others. By producing work that is not only insightful but also impeccably constructed your care shines. By mastering Microsoft Word’s formatting features, you can elevate your communications, reinforce your credibility, and set a standard for others to follow.
Support and Additional Content
If you would like me to create content on exactly how to use each of the features within Microsoft Word, let me know. Then you can take the time to consume the content further and apply perhaps immediately apply the principles. Your documents will not only inform but also impress.
If you have any questions about Word formatting or run into challenges applying the techniques I have discussed in this blog, feel free to email me from the contact form here on my site. I’m always happy to help, especially for those that wish to grow and improve.
And if you’re interested in a deeper dive or personalized guidance, I also offer one-on-one training sessions tailored to your needs. Don’t hesitate to reach out; together, we can ensure your documents always make the right impression.